Siganor
Contact
Siganor Learn

Learn PLC programming with the Siganor Simulator

The Siganor Simulator is a ladder logic simulator in the style of Studio 5000 that runs in your browser. Write rungs, set inputs, watch timers and counters, add I/O modules and run test scenarios. It is free, needs no install or account, and keeps your projects in this browser.

Start with the lessons, practice with real cases, then connect TRACE on your PC and watch the simulation as if it were a real PLC.

Free · Runs in the browser · No account · First steps · Video tutorials

On a phone you can open the lessons, run the simulation and press the inputs. Writing rungs needs a computer.

First steps

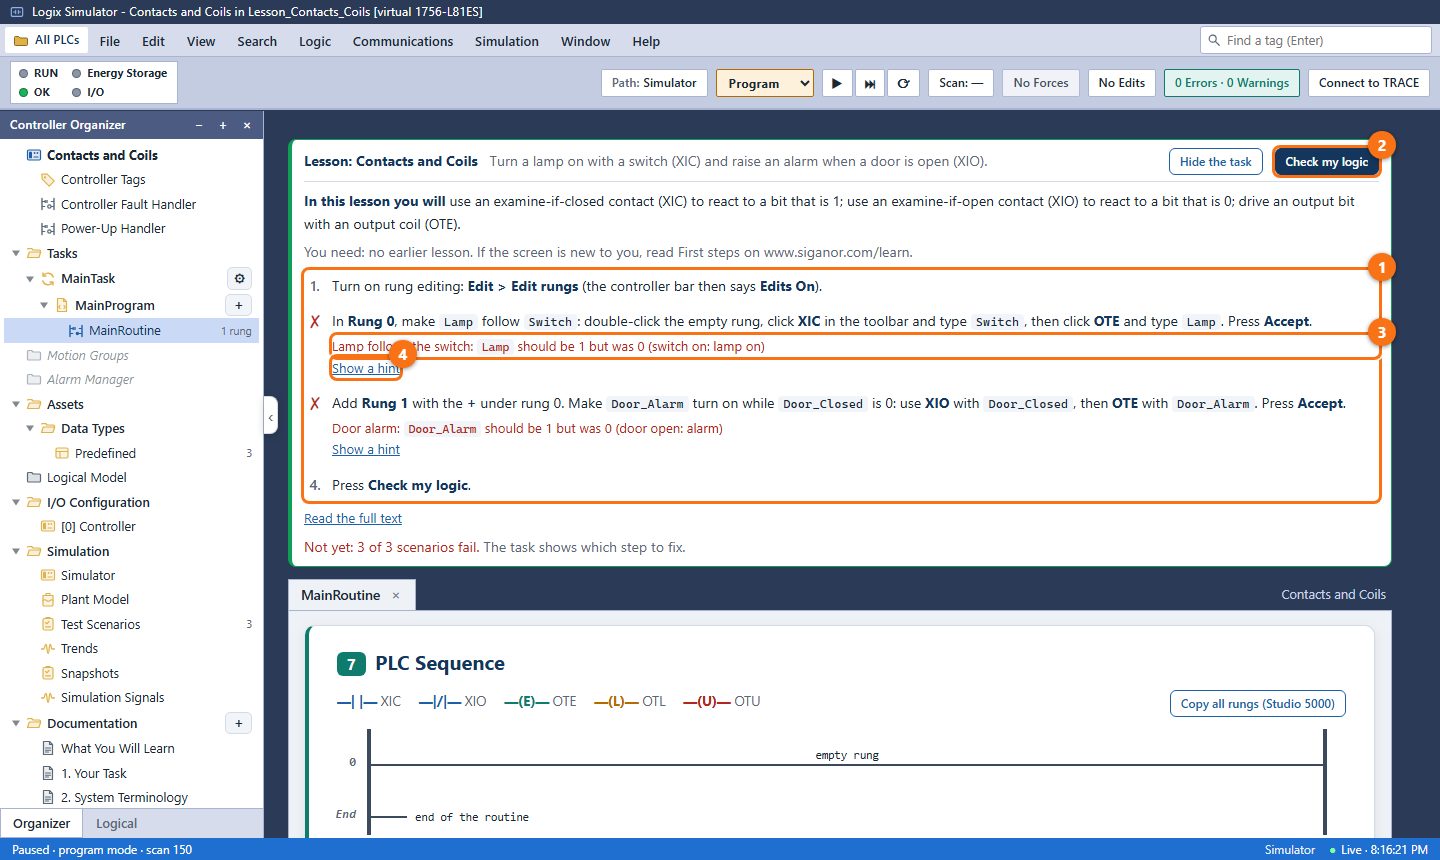
New to the simulator? These short guides show the screen and the four things you do most. The numbers in each picture match the steps.

1The screen at a glance

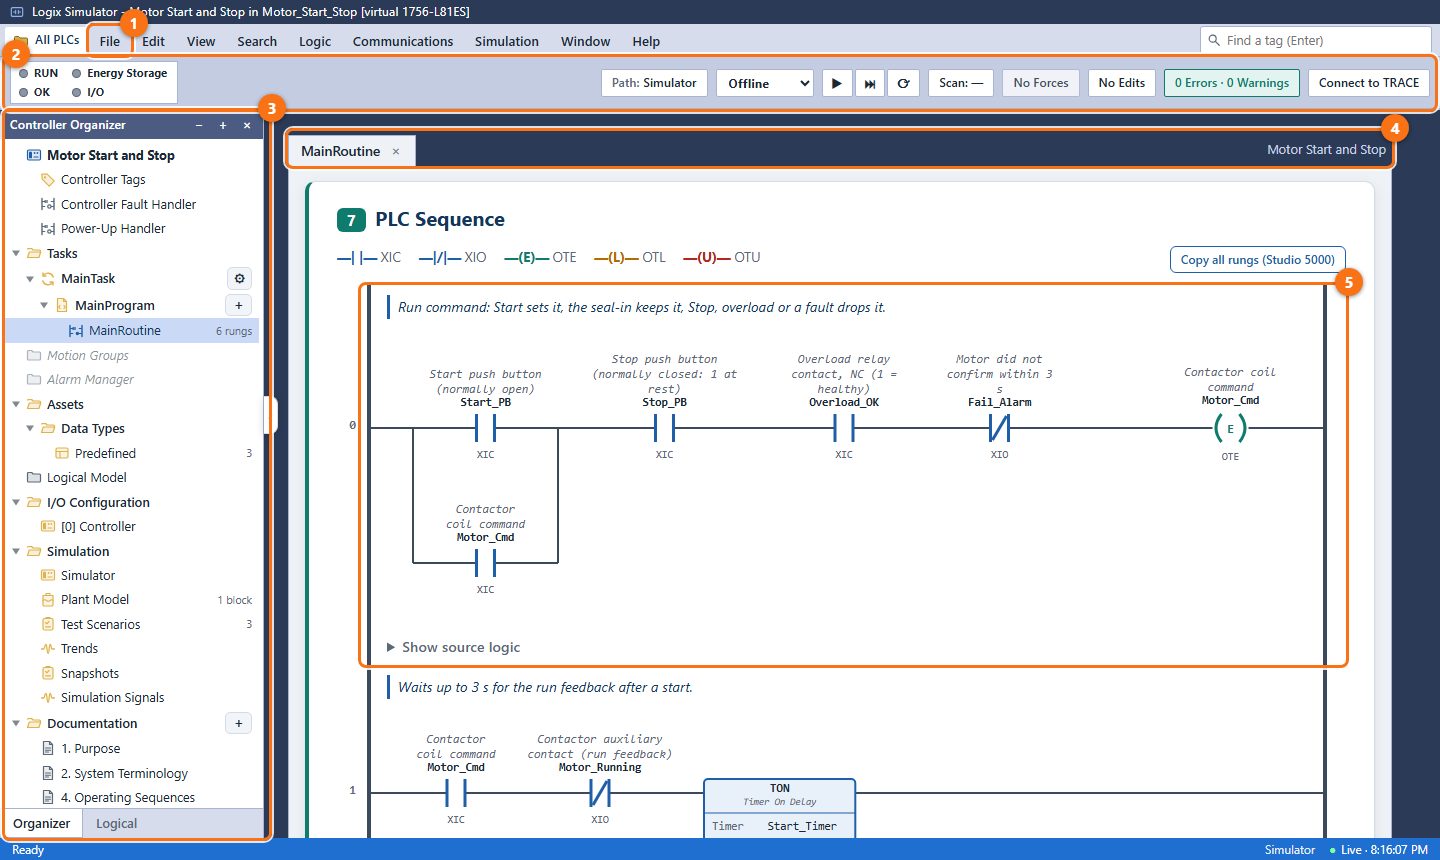
The simulator looks like the editor of a Logix 5000 PLC. These are the five areas you use most.

  1. Menus. File (export, PDF), Edit (Edit rungs), View, Search, Logic (Logic Check), Communications (Connect to TRACE), Simulation (Open Simulator, Run, faults), Window and Help.
  2. Controller bar. The mode (Offline, Program, Run), Run, Step and Reset, the number of forced tags, Edits On / No Edits, the errors of the Logic Check and Connect to TRACE.
  3. Controller Organizer. The tasks and routines, Controller Tags, the I/O modules and the simulation pages. Double-click an item to open it.
  4. Tabs. MainRoutine and every page you open. The Simulator is a tab too; closing it does not stop the simulation.
  5. The ladder. One rung per row, numbered from 0 as in Studio 5000. While the simulation runs, the powered parts turn green.
Open this project →
The Siganor Simulator with the menus, the controller bar, the Controller Organizer, the tabs and the ladder marked 1 to 5
The screen at a glance: the numbers match the steps. Click the picture to enlarge it.
2Write your first rung

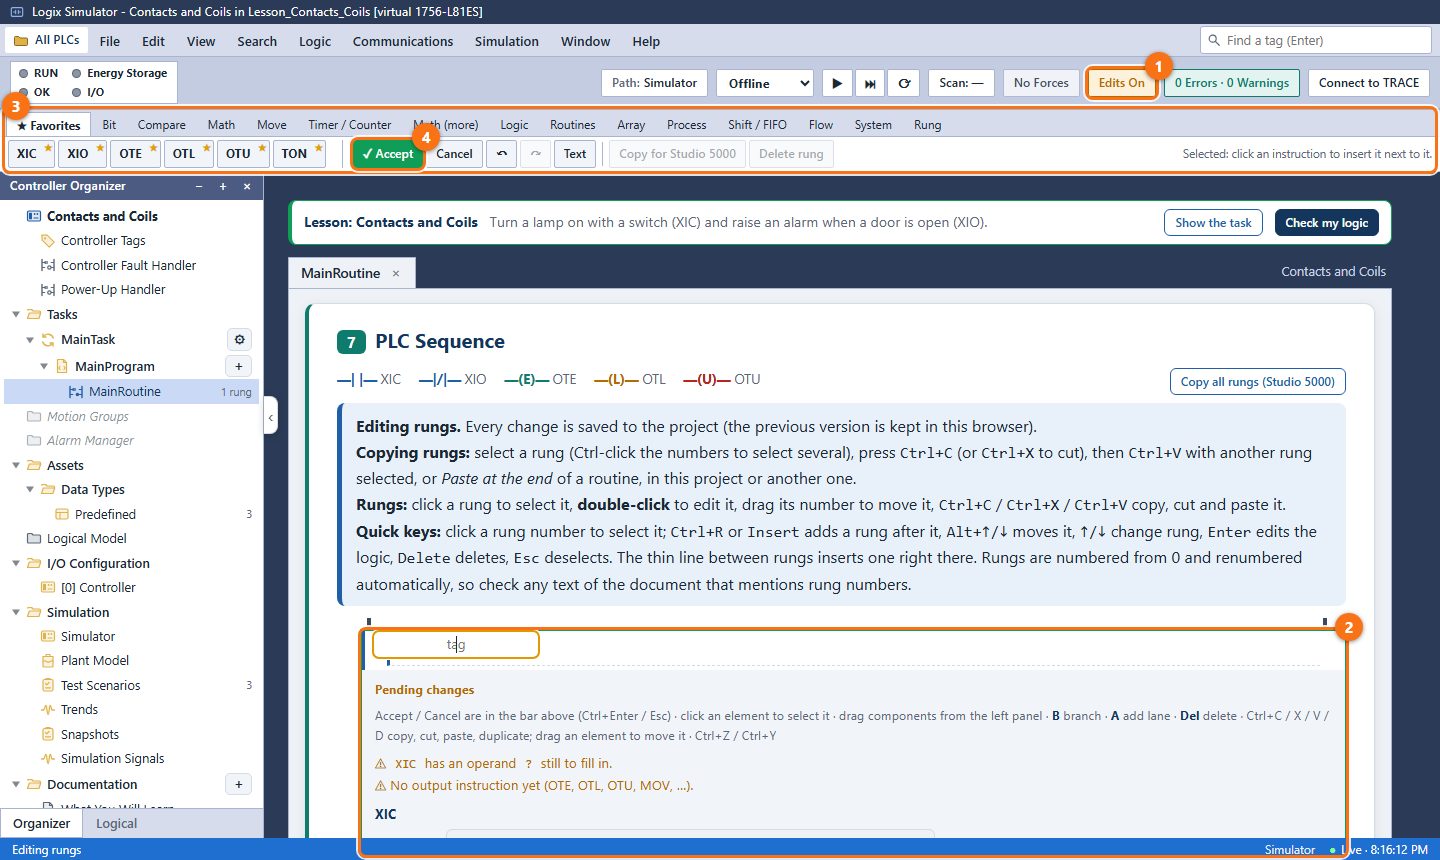
Rungs are edited in place. You add instructions from the toolbar and type the tag names.

  1. Turn on Edit > Edit rungs. The controller bar changes to Edits On and the instruction toolbar appears.
  2. Double-click the rung you want to change. It opens for editing.
  3. Click an instruction in the toolbar (XIC, OTE ...), or drag it onto the rung, then type the tag name. Open another tab of the toolbar for timers, compares or math.
  4. Press Accept (or Ctrl+Enter) to write the rung to the project. Cancel (Esc) drops the change.
Try it in lesson 1 →
A rung being edited, with the Edit menu, the instruction toolbar and the Accept button marked
Write your first rung: the numbers match the steps. Click the picture to enlarge it.
3Run and test

The simulation runs your logic scan after scan. You change the inputs and watch the outputs.

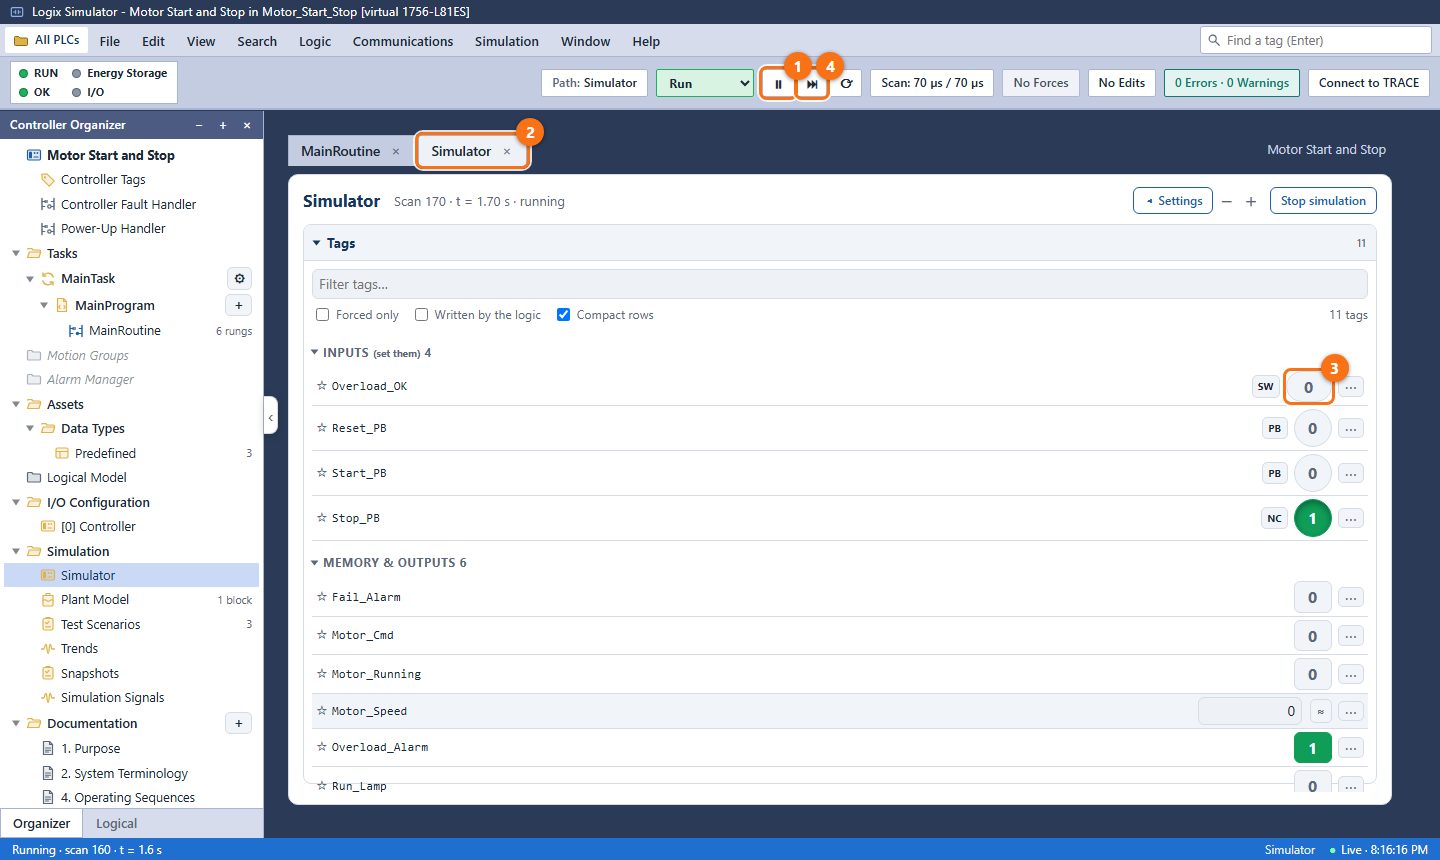
  1. Press Run (▶) in the controller bar. The mode changes to Run, the scan count starts and the button becomes a pause (⏸).
  2. Open the Simulator tab (Simulation > Open Simulator). It lists every tag with its value.
  3. Click a 0 / 1 to change an input, or type a number. Changing a tag that the logic writes forces it until you release it.
  4. Step (⏭) runs one scan at a time. Reset (⟳) puts every tag back to 0 and clears the timers.
Open this project →
The Simulator tab with the Run button, the tab, an input value and the Step and Reset buttons marked
Run and test: the numbers match the steps. Click the picture to enlarge it.
4Save, export and back up

Your projects are saved in this browser as you work. Keep a copy before you clear the browser or change computers.

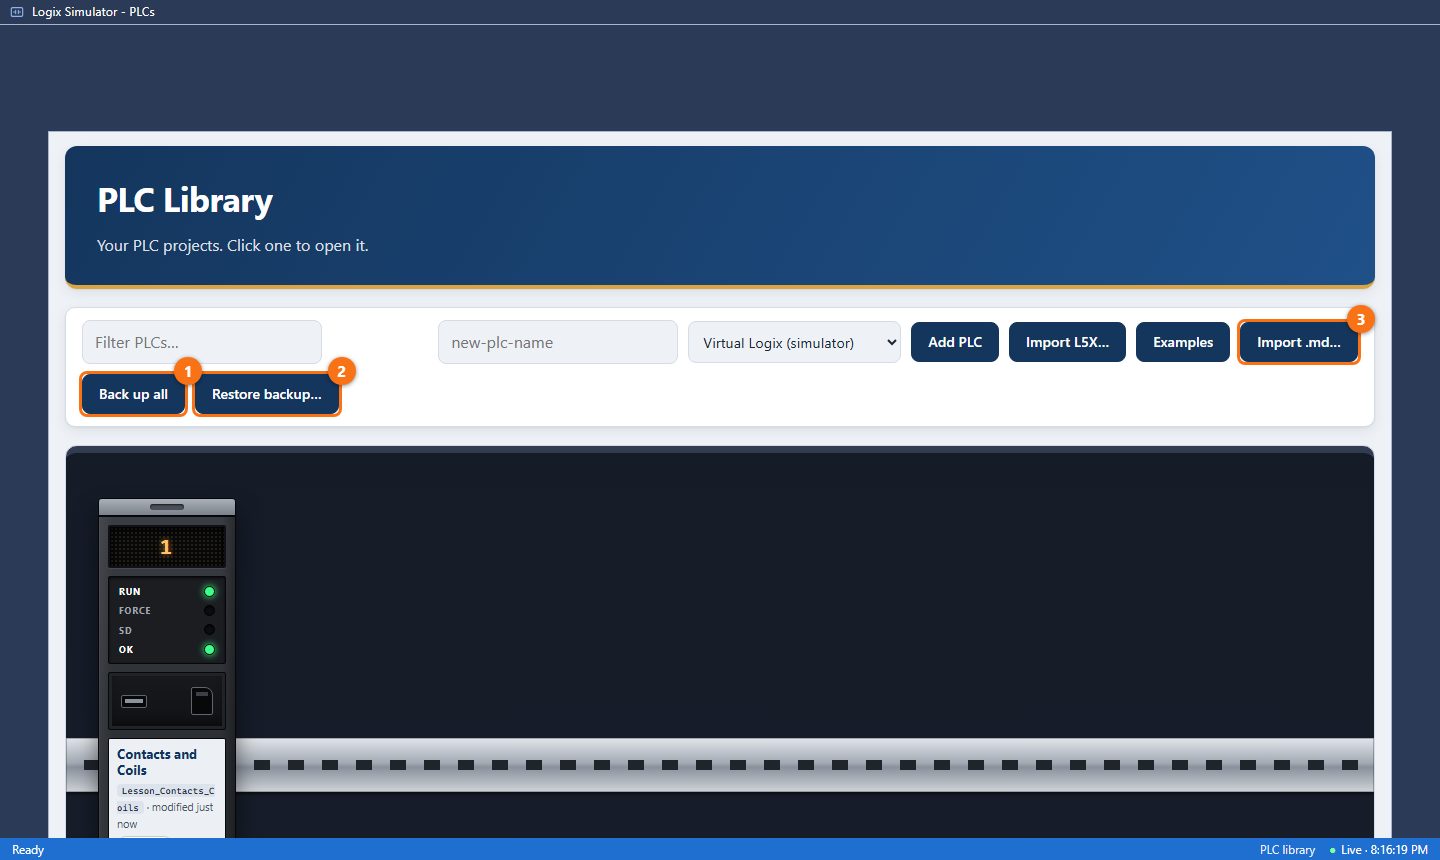
  1. Back up all saves every project of this browser in one file.
  2. Restore backup adds the projects of that file, here or on another computer.
  3. Import .md adds one project exported with File > Export project (.md). To take your rungs to Studio 5000, use File > Export L5X.
Open the library →
The PLC Library with the Back up all, Restore backup and Import buttons marked
Save, export and back up: the numbers match the steps. Click the picture to enlarge it.
5Do a lesson

Each lesson asks you to write a few rungs. The bar over the project tells you what to do and checks your work.

  1. The task lists the steps of the lesson. Hide the task folds it; Read the full text shows the explanation.
  2. Write the rungs, then press Check my logic. It runs the lesson's test scenarios on your logic.
  3. Each step shows ✓ or ✗. A ✗ says which tag had the wrong value and when.
  4. Show a hint gives a clue for that step. After three tries the solution is available too.
Start lesson 1 →
A lesson with its task panel, the Check my logic button, a step marked with a cross and its hint marked
Do a lesson: the numbers match the steps. Click the picture to enlarge it.

Video tutorials

Short classes of about two minutes. Watch one, then do the same in the simulator with its lesson.

2:12

Introduction to timers

What a TON timer does: the EN, TT and DN bits, and the PRE and ACC values that measure the delay.

What you will see
  1. 0:08A timer measures a delay in the program.
  2. 0:230 = false · 1 = true
  3. 0:38PRE = planned delay · ACC = elapsed time
  4. 0:54EN and TT are 1 while the request is active and the timer is counting.
  5. 1:11When the delay ends, DN becomes 1, TT becomes 0, and EN stays at 1.
  6. 1:26An XIC reads the bit. Each bit can control a different output.
  7. 1:41If the request ends before 5 s, the fan stays off.
Practice it: Timers: On Delay and Off Delay
2:33

TOF with Yota

Water keeps flowing for three seconds after Yota releases the pedal. Watch the TOF bits and see what happens when she presses again.

What you will see
  1. 0:00TOF · Off-delay timer
  2. 0:03Rotate your phone
  3. 0:08Yota wants one last sip
  4. 0:24A bit answers one question
  5. 0:44PRE and ACC · The TOF delay
  6. 1:04Release the pedal · The delay starts
  7. 1:21Delay complete · Water stops
  8. 1:39Timer bits control Ladder outputs
  9. 1:59Yota presses again before time is up
  10. 2:17An output that turns off later
Practice it: Timers: On Delay and Off Delay
Chapter 1 · 2:05

My first lamp

From a light switch at home to your first rung: a contact reads Switch, a coil writes Lamp, and you test it in the simulator.

What you will see
  1. 0:28Close the circuit: closing the switch lets current flow
  2. 0:38From switch to lamp: input, PLC, output
  3. 0:48XIC reads the Switch bit: false at 0, true at 1
  4. 0:59OTE writes the Lamp bit: the output follows the rung condition
  5. 1:10Open rung 0: Edit, Edit rungs, double-click
  6. 1:20Insert XIC and enter Switch as the tag
  7. 1:28Insert OTE, enter Lamp and click Accept
  8. 1:37Click Run and open the Simulator tab
  9. 1:45Set Switch to 1: Lamp changes to 1
Practice it: Contacts and Coils
Chapter 2 · 2:08

Seal-in

Keep a motor running after Start is released: a Motor contact in parallel with Start, a normally closed Stop, and a run lamp.

What you will see
  1. 0:07Open the seal-in lesson
  2. 0:13Release Start: the motor keeps running
  3. 0:52Add and open a rung
  4. 0:59Build the parallel branch
  5. 1:13Add Stop and the Motor coil
  6. 1:29Add the pilot light rung
  7. 1:39Start released: both outputs at 1
  8. 1:50After Stop: both outputs at 0
Practice it: Start and Stop with a Seal-in
Chapter 3 · 2:02

TON · On-delay timer

Program a five-second TON to start a fan after the heater switches on.

What you will see
  1. 0:00TON Timer
  2. 0:10A fan with a start delay
  3. 0:19LADDER · THE DN BIT STARTS THE FAN
  4. 0:44Open the timers lesson in Siganor Learn
  5. 0:47Make sure Edits On is active
  6. 0:50Double-click the empty rung
  7. 0:53In Bit, click XIC
  8. 0:56Enter Heater_On
  9. 0:59Open Timer / Counter
  10. 1:02Click TON
  11. 1:05In Timer, enter Fan_Delay
  12. 1:09Preset = 5000 ms · Accum = 0
  13. 1:14Click Accept to save
  14. 1:17Click + to add the second rung
  15. 1:20Open the rung and return to Bit
  16. 1:23Insert XIC with Fan_Delay.DN
  17. 1:27Click OTE
  18. 1:30Enter Fan
  19. 1:33Click Accept to save
  20. 1:36Click Run
  21. 1:39Open Simulator in the organizer
  22. 1:42Turn on Heater_On · TON starts timing
  23. 1:47ACC reaches 5000 · DN = 1 · Fan = 1
  24. 1:52Turn off Heater_On · ACC and Fan return to 0
  25. 1:57Try the TON in Siganor Learn
Practice it: Timers: On Delay and Off Delay
Chapter 4 · 2:19

TOF · Off-delay timer

Set up a TOF in the simulator to keep a light on for three seconds after the motion sensor stops detecting movement.

What you will see
  1. 0:00Program an off-delay · Rotate your phone · Watch in landscape
  2. 0:12Keep a light on after motion stops
  3. 0:24Motion → TOF Light_Delay · Light_Delay.DN → OTE Light
  4. 0:37Timers lesson
  5. 0:47Double-click the new rung
  6. 0:50Click XIC
  7. 0:53Enter Motion
  8. 0:56Open Timer / Counter
  9. 0:59Click TOF
  10. 1:02Timer = Light_Delay
  11. 1:05Preset = 3000 · Accum = 0
  12. 1:09Accept saves the rung
  13. 1:14Add and open the next rung
  14. 1:18XIC Light_Delay.DN
  15. 1:23Insert OTE
  16. 1:26Set the coil tag to Light
  17. 1:29Accept saves the rung
  18. 1:32Click Run
  19. 1:35Open Simulator
  20. 1:39Use Motion as an SW input
  21. 1:43Motion = 1 · Light turns on
  22. 1:48ACC = 0 · EN = 1 · TT = 0 · DN = 1
  23. 1:53Turn Motion off · Light stays on
  24. 1:59ACC increases · TT = 1 · DN = 1
  25. 2:05ACC = 3000 · Light turns off
  26. 2:14Try the three-second delay
Practice it: Timers: On Delay and Off Delay

How a lesson works

1Step 1

Open

Each lesson opens in the simulator as your own project, with its task and the tags you need.

2Step 2

Write

Edit the rungs in the ladder editor and try them in the Simulator tab.

3Step 3

Check

Check my logic runs the lesson's test scenarios on your rungs and tells you what is still wrong.

1

Ladder from scratch

Six short lessons, in order: contacts and coils, seal-in, timers, counters, analog values and I/O modules. Your progress is saved in your browser.

Lesson 1 · Beginner · 10 min

Contacts and Coils

Turn a lamp on with a switch (XIC) and raise an alarm when a door is open (XIO).

XIC · XIO · OTE

Start lesson
Lesson 2 · Beginner · 15 min

Start and Stop with a Seal-in

Keep a motor running after the Start button is released, and stop it with a normally closed Stop button.

branch · seal-in · NC stop

Start lesson
Lesson 3 · Beginner · 15 min

Timers: On Delay and Off Delay

Start a fan 5 s after the heater (TON) and keep a light on 3 s after the last motion (TOF).

TON · TOF · .DN

Start lesson
Lesson 4 · Beginner · 15 min

Counting Boxes

Count boxes with CTU, light a lamp when a pallet holds 10, and clear the count with RES.

CTU · RES · .ACC

Start lesson
Lesson 5 · Intermediate · 20 min

Compare and Move: an Analog Level

Read a level from an analog input module, copy it with MOV and drive a pump and an alarm with LES and GRT.

1756-IF8 · MOV · LES / GRT

Start lesson
Lesson 6 · Intermediate · 20 min

Digital I/O Modules

Run a conveyor from the points of a 1756-IB16 input module and a 1756-OB16E output module.

1756-IB16 · 1756-OB16E · module points

Start lesson
2

Practice with real cases

Complete projects of common machines. Each one comes with its own test scenarios: run it, change it and see what breaks.

Beginner · 15 min

Motor Start and Stop

Three-wire motor control: Start seals in, a normally closed Stop and an overload drop the motor, and a watchdog alarms when the contactor does not confirm.

seal-in · NC stop · OTL / OTU alarms · TON watchdog

Open example
Beginner · 20 min

Tank Level with Fill Pump

A fill pump keeps a tank between 300 and 800 mm from a 4-20 mA level transmitter, with a latched high-high alarm that needs an acknowledge.

analog input module · hysteresis · LES / GRT · latched alarm · plant model

Open example
Intermediate · 20 min

Conveyor with Box Counter and Jam Detection

A photo-eye counts boxes into batches of 5 with CTU, and a timer latches a jam alarm when a box blocks the beam for more than 3 seconds.

CTU counter · RES · TON jam timer · batch stop · reset interlock

Open example
Intermediate · 25 min

Duty and Standby Pump Alternation

Two pumps take turns as lead on each demand, the standby starts when the lead fails to confirm, and a high demand runs both.

OSF one-shot · two-step toggle · lead / lag · feedback watchdog · failover

Open example
Beginner · 15 min

Traffic Light

A fixed green, yellow and red cycle from one self-restarting timer, with a walk lamp while the light is red.

TON cycle · LES / LIM / GEQ · timed sequence

Open example
Intermediate · 25 min

Bottle Filling Line

A conveyor stops each bottle under the filler, opens the valve for 3 s and counts a batch of 6, on 1734-IB8 / OB8 Point I/O modules.

digital I/O modules · TON .TT · CTU batch · OTL / OTU

Open example
Intermediate · 25 min

Car Wash Sequence

Four timed steps (prewash, wash, rinse, dry) latched one after the other, with a done lamp and an emergency stop.

step sequence · OTL / OTU · TON per step · emergency stop

Open example
Beginner · 15 min

Parking Lot Counter

Cars in and out on one counter (CTU / CTD), a full sign, free spaces with SUB and an entry gate held open by a TOF.

CTU / CTD · SUB · TOF · full sign

Open example
3

Find the fault

A machine that does not work as it should, with the operator's report. Use the simulator, cross reference, trends or TRACE to find the rung with the mistake, fix it, and Check my logic runs hidden test scenarios on the whole machine.

Challenge 1 · Beginner · 15 min

Exhaust fan that stops after Start

Find why the fan stops as soon as the operator releases Start, and fix the rung that causes it.

seal-in · run feedback · cross reference

Start challenge
Challenge 2 · Intermediate · 20 min

Packing conveyor with a false jam alarm

Find why the jam alarm stops the belt when no box is stuck, and fix the rung that causes it.

TON · XIC and XIO · trends

Start challenge
Challenge 3 · Intermediate · 20 min

Wash water tank that fills to the high-high alarm

Find why every fill ends on the high-high alarm instead of stopping at 800 mm, and fix the rung that causes it.

GRT and LES · analog level · cross reference

Start challenge
4

Simulator + TRACE

TRACE is the free Siganor tool to monitor, record and replay PLC signals. These guides connect it to the simulator so you can practice diagnostics on your PC.

Beginner · 15 min

Watch the Simulator from TRACE

Publish this simulation as a virtual PLC on your PC and watch its tags move in TRACE.

Siganor Link · Connect to TRACE · Monitor tab

Open tutorial
Intermediate · 20 min

Record and Replay a Motor Start in TRACE

Record the signals of a motor start and stop in TRACE, then review them in the Replay tab.

Rec · Replay tab · crosshair · notes

Open tutorial
Windows · Free

Get TRACE

The tutorials need TRACE 1.11.1 or later. Siganor Link, the program that connects the simulator to TRACE, is installed with it.

Download TRACE

Prefer to explore on your own?

Open the simulator →